|
|
Dogbone Traction, Part 4 (Rail3D)
By Sanford Mace
The original "Dogbone Traction" article, now designated as Part 1, is at our sister site, V-Scaler.com.
-Ed.
 See the Dogbone Rail3D Slide Show See the Dogbone Rail3D Slide Show
This is the last of a series. If you have followed the earlier ones you can skip to the part labeled Restart Here.
As I explained in "Dogbone Traction, Part 2 (BVE)," Al Barten produced a Dogbone traction route and wrote about it in a V-Scaler article titled, appropriately enough, "Dogbone Traction." I read the article and liked the little route a lot. I wanted one. I am sure I could have asked for and received a copy of the route, but this is a Trainz route and I do not own a copy of Trainz. I do have MSTS and BVE though, so I decided to make versions for those simulators.
Restart Here
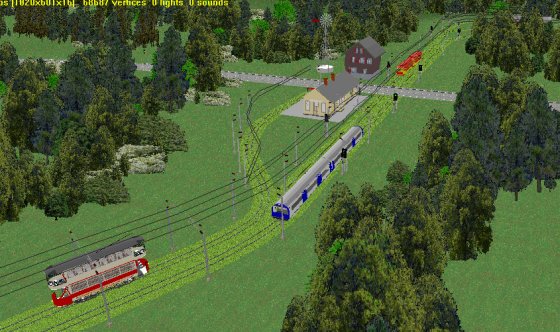
This is how I made the Rail3D version. I am writing this as a novice user, so I may get some of this wrong, but it was a learning process. From the settings in this picture from Al�s original article, we know what we want to build. (As an aside, you might want to save the picture below, it may be of use later). For more information about Rail3D check the support group at Yahoo and Rail3D.
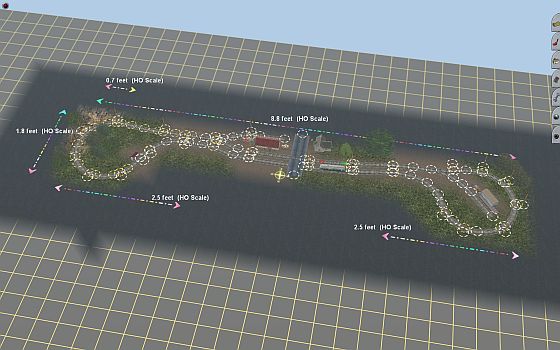
 We will build something like this plan to the right.
We will get to the X�s and place names later.
We will build something like this plan to the right.
We will get to the X�s and place names later.
While I was building the other two versions, MSTS and BVE, Rail3D came out with its 100th build. There were a couple of very good mentions and reviews at VR Blogger and UKTrainSim.
I have Rail3D because it is the only simulator I have found that has any representation of the Schwebebahn monorail. I like monorails, so I got a copy once upon a time. I updated to the latest build and started to make this version of the Dogbone.
As with the MSTS version, I had never built anything with Rail3D. I had to learn how to do this. I used the Tutorial section from Rail3D. Rather than me tell you how to make a route, I will let you use the Tutorial section with some changes. In the help section of Rail3D there is a section marked Tutorials. Select Help, then Tutorials. See the screen shot below.

Tutorials
This brings up the following page. An enlarged view of the expanded menu is shown below it.

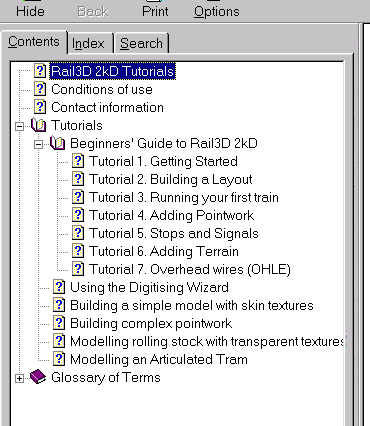
Select the + next to Tutorials, then select the + next to Beginners� Guide to Rail3D 2kD and a very nice set of tutorials is presented.
Tutorial 1. The 1st tutorial will help you learn how to work and navigate in Rail3D.
 Tutorial 2. Before starting the 2nd tutorial, make the following changes: Select Track in the main menu. Make sure Show OHLE is checked; if not, click it to make it is checked. This allows the overhead to show up - and we are building a traction route with overhead. Select Track in the main menu and then select Track Laying Options. This brings up the dialog on the right. Make Double Line Spacing 4.2 meters and make sure OHLE is checked.
For now leave everything else alone and select Make Default. Then select Track in the main menu and then select Track Laying Options to make this window go away and give us the largest area to lay tracks in. Now go to the 2nd tutorial. Use the dogbone shape we showed above. Make your first track line a 200-meter north-south (up-down) section. Your curves need to be 20-meter radius. The North end S-curve are two back-to-back 45 degree curves.
Tutorial 3. In the 3rd tutorial choose and appropriate tram or trolley. For now try to avoid a double decker type tram. As the tutorial says, what you have may be different. If you do not have a tram or trolley you want to use, you can do as we did in the MSTS version and use a railcar, or if you wish, a small switcher and coach. Before you finish this tutorial we are going to make a track inspection. Run your train in the #2 view looking forward (see the 1st tutorial). If you see a section of track with the line supports on the inside of the loop, click once on the section to choose it, then right click. A dialog will come up. The last thing in the dialog is Swap track �side�. Choose this and the pole will move to the outside. Run the entire loop checking for pole location before going to the 4th tutorial.
Tutorial 4. In the 4th tutorial, use the station location and freight house location to place the points/switches. We are not going to connect these. If you want to play with this feature, save your work and make what ever changes you want to play. Just do not save it as the Dogbone. See the proposed track diagram above for locations and direction.
Tutorial 5. In the 5th tutorial you will place signals and stops in your route. In the track diagram above, use the blue X for signal locations and the purple X for optional signal locations. If you wish to place stops, use the red wait house location and the southbound station stop. If you plan to make an active road, do not place a stop at the northbound station. If you are not going to make an active road, you can place a stop there. Use a stop time appropriate for the stock you want to use. If you are using a stock type with automatic doors, use no less than 30 seconds; otherwise 10-15 seconds will work.
Tutorial 6. In the 6th tutorial you will add some terrain. In Al's model and the BVE and MSTS versions, we added a hill at the Northwest corner of the route; the rest was fairly flat. Add trees with the Tree and Brush spray gun in the Scenery Menu. It is down around the bottom. Pick the type of tree and brush that you want. I used conifers because I like pine flats.
Tutorial 7. In the last 7th tutorial you can change the overhead and track type to what you want. I used a grass covered tram track and a center and outside tram pole. Again your options may be different.
1 | 2 | Next >>
Article and screen shots �2006 Sanford Mace. All rights reserved.
More Articles.
[Visit the VR Reading Room.]
If you want to be notified when a new article arrives, join the VR-News group at Yahoo. This group is purely for notification. Anyone can join; only the moderator can post.
�2006 Sanford Mace. All rights reserved.
|
