A Lionel Layout for Virtual Railroader
By John D'Angelo
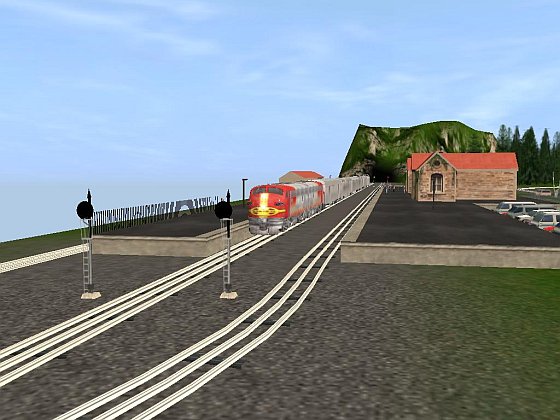
The Chief leaving Northville.
Many of us remember our very early days of model railroading. I happen to be an old timer and my childhood did not involve video games. We played baseball in empty lots without uniforms, roller skated on the streets, played with scooters or wagons that we built in our backyards, or played with trains.
In my neighborhood there were two groups of toy train users: there were the Lionel lovers and the American Flyer crowd. We would go to each other's homes and enjoy running whatever anybody had. Some boys only had their trains out during Christmas season, running along the floor in front of the Christmas tree, and others had layouts on sheets of plywood. Whatever they had, we had fun together.
The sounds of those toy trains were really great. The American Flyer trains ran on two-railed track, had a synchronized “choo choo” sound and puffed smoke that had a great pine scent. The Lionel trains ran on three-railed track, had a beautiful whistle generator built into the tender, and they all made a great clickity-clack sound as they ran around. The greatest accessories were the Lionel bascule bridge and operating loaders of all types. I had American Flyer trains, but used the Lionel magnetic crane on my layout.
The layouts we had, if they were on a plywood base, were essentially flat, with a fairly bright green grass color, tunnels that came out of nowhere, and were just plain fun to run. The trains used a four-step motor; forward, neutral, reverse, and neutral, in which the step was chosen by interrupting the current. Because of this, they were prone to stopping unexpectedly if the train rocked a bit too much. Based on what my friends and I did, I would say that switching operations took second place to just running the hell out of them!
The Lionel Layout
While I have tried to create layouts for Virtual Railroader without any third-party items, the Lionel layout needs to use a few third-party items that are available at the Trainz Download Station (DLS). The layout was created using TRS2006 with SP1. I suggest that after downloading the layout, you go to it in CMP, then instruct CMP to download the remaining items. All of the items are at the DLS and will be downloaded and installed for you. In any case I am listing those items here:
| Bascule lift bridge 2 |
(Vulcan) |
KUID: 60238:27212:1 |
| O Gauge Girder Bridge 1-Track |
(Mcguirel) |
KUID: 2:72938:38003:1 |
| O Gauge Girder Bridge 2-Track |
(Mcguirel) |
KUID: 2:72938:38004:1 |
| O Gauge Stone Tunnel 1-Track |
(Mcguirel) |
KUID: 2:72938:33002:1 |
| O Gauge Stone Tunnel 2-Track |
(Mcguirel) |
KUID: 2:72938:33003:1 |
| O_ 45_Degree Crossing |
(jjslll54) |
KUID: 2:46819:17002:1 |
| O_Gauge_Bumper |
(jjslll54) |
KUID: 2:46819:24018:1 |
| O_Gauge_Track |
(jjslll54) |
KUID: 2:46819:38196:1 |
| ATSF Observation (used in the session) |
(Icebreaker) |
KUID: 2:13574:8 |
I tried a new technique to assist me while building this layout. Rather than hunt through the assets in the Surveyor menu, I first joined a blank baseboard to my single baseboard layout corner-to-corner using the merge function. I then laid all the assets I felt that I would use on the blank and used the “Get” function to copy them over to the layout as needed. It made the process much easier. Once I was finished, I just deleted the “tray” baseboard.
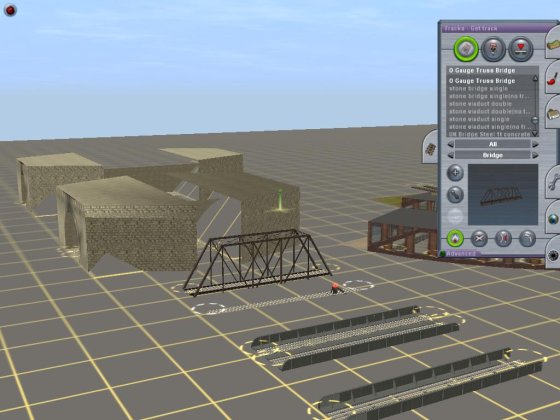
Choosing the Truss Bridge from the “Tray”.
Here is the completed layout map, using TrainzMap:
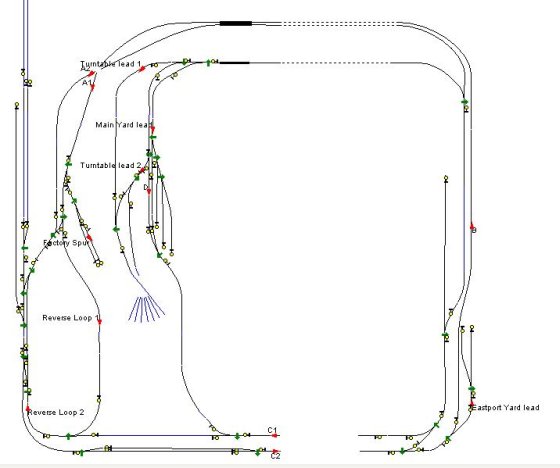
The completed layout.
Note that because the bascule bridges are open, the tracks do not go across the opening. Of special interest are the track marks for the reverse loop and the interlocking towers. In a loop style layout, such as this layout, track marks are essential for routing your trains under AI to ensure that the train follows the correct route and does not reverse direction. AI is designed to take the shortest route to a destination. Without using the track marks a train could decide to head in reverse to a station because it found a shorter way to get there. Using the track marks avoids this. I've named yard destinations and used interlocking towers for way point track marks.

Tower “A”.
Note that Tower “A” has track marks “A1” and “A2” for routing purposes. Some towers have only one track mark, others will have 2. Here are some pictures of the layout.
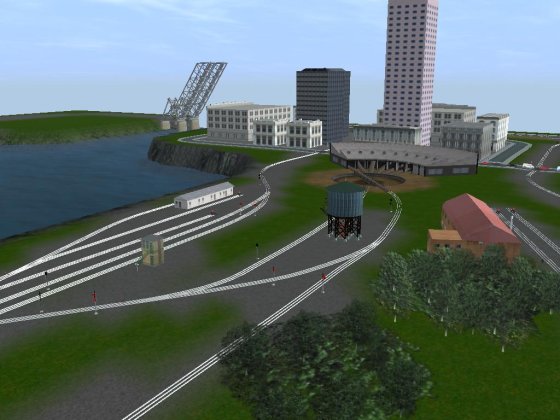
Main yard.

Eastport.
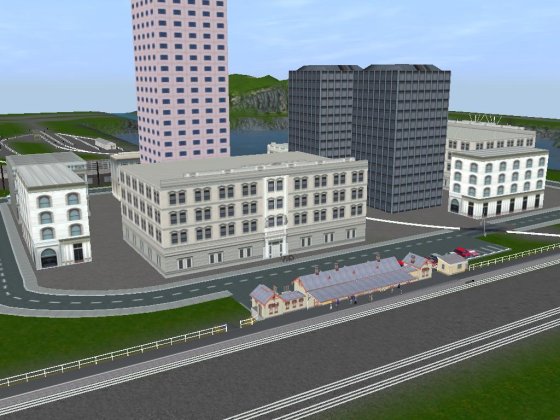
Riverdale.
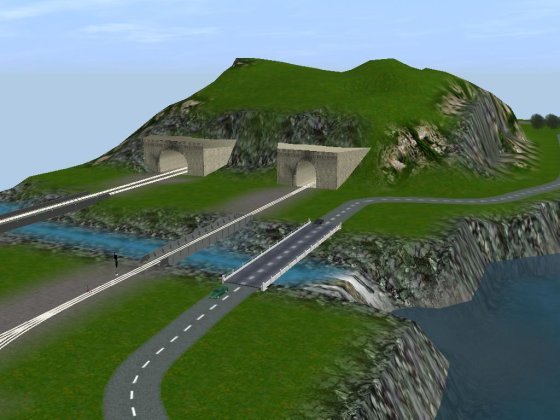
Tunnels.
Operating the Layout
The layout is configured for passenger operation as an “Out and Back” layout. Continuous running is possible also on one route, if you wish. The included session has the “Chief” leaving from Northville station, heading south. It is routed through the track marks and stations so that it will traverse the layout, then come back to Northville. At Northville, there are two portals to the north, which is Lionelville. The portal will accept the train, hold it for five minutes, then return it to Northville for reuse.
The train's route from Northville is programmed to travel via track marks and stop and load at stations. Here is the route as programmed in the included session:
C2, B, A1, Reverse Loop 1, Reverse Loop 2, A2, Eastport (Load Passengers), Riverdale (Load Passengers), Northville Northbound Track(Load Passengers), To Lionelville Portal.
All tracks are signaled for two-way operation. I have tried running three trains at one time, the Chief (an ATSF F7 pulling streamlined cars), the Cannonball (a steam loco pulling some Pullmans) leaving from the northbound track of Northville and following the same route as the Chief but leaving one minute behind it, and a GP diesel working some boxcar deliveries and pickups. Everything ran well, but the GP engineer needs to be aware of where the passenger trains are. Under AI, by giving the GP “drive to” instructions, it was kept from crashing into the passenger trains. My suggestion is to just work with the one train for a bit, then add the second passenger and finally try adding the GP, spot some freight cars around the layout, and work it.
Tracking cameras have been placed around the layout for your use, just use the tracking camera option to watch them follow the action.
In the supplied session, I set the time of day at 8:00 AM and the clock speed at 32x. This will give you the chance to get in some nighttime running. I DO have one thing to advise you about:
Caution
In the session, derailment realism has been set to “none” and this is for an important reason. Lionel did not build their locomotives and passenger cars to scale. To negotiate the toy track curves, they were made shorter than in real life. Trainz has their passenger cars true to scale and they are longer than Lionel cars.
When I designed this layout, I made the “look and feel” to that of a Lionel toy train layout. Although I was able to get most of the problems cleared up by adjusting the track curves, the reverse loop between Reverse Loop 1 and Reverse Loop 2 track markers is problematic. If I used the realistic setting for derailment, sometimes the Chief would negotiate the curve OK, and sometimes it would derail, causing all kinds of havoc! I decided that rather than expand the layout and lose that toy train layout look, I would just change the derailment setting to “none”.
I think that about covers everything. Have fun playing trains in your virtual attic!
John
Article and screen shots �2009 John D'Angelo. All rights reserved.
More Articles:
[Visit the VR Reading Room.]
If you want to be notified when a new article arrives, join the VR-News group at Yahoo. This group is purely for notification. Anyone can join; only the moderator can post.
